 Reading Time: 4 minutes

If you are a machine learning professional, you would be using the Jupyter notebooks frequently. There can be problems running code in our laptops due to limited memory and the limited number of cores. Some models like SVM or GridSerach operations can take a lot of time to run on our Windows laptops. If working with anaconda, You will find that Python runs slower in Windows compared to Linux. To get around these limitations and run our models faster, we have various options available with us like
1. AWS Sagemaker
2. Azure ML
3. Cloud AI from Google
These are SAS offerings from major cloud providers and then there are others options from other providers also. One drawback would be that we will have to use their Jupyter notebooks instead of directly running our self-created notebooks.
In this post, I will discuss the option to use AWS EC2 resources for raw computing power. These can be used as follows
1. Create AWS EC2 instance using Deep learning AMI.
2. Run Jupyter Server in EC2 instance.
3. Connect to Jupyter server from your laptop over SSH tunnel
This will ensure that you can use the higher computing power of AWS and yet get the convenience of Jupyter notebook model. Do remember that AWS is a costly resource. You should check the AWS cost calculator for more details before choosing any resource.
Below detailed steps can be used to set up your own AWS EC2 box for Machine learning
1. Download and install network tools on your Windows machine from putty and bitvise tunnelier. Also get filezilla.
2. Create AWS EC2 instance using highest version of Deep Learning AMI. Choose Ubuntu or Amazon EMI as per your comfort. These AMIs are preloaded with anaconda based environments as also Jupyter notebook package.
3. Choose the proper amount of RAM and HDD as you can afford. Opt for higher values but make sure to turn off machines when not needed. AWS Instance scheduler service can be used to schedule instances as per fixed time slot. Alternatively, install the AWS app on mobile and use it to shut down machines at will.
4. Opt for Elastic IPs if multiple colleagues will use it. Please release Elastic IPs when not needed. These IPs costs $3 per month if not attached to an instance.
5. For SSH and FTP, Enable ports 20, 21 & 22. Use security group or set these values during EC2 instance creation.
6. Convert PEM files downloaded from AWS to PPK file using PuttyGen tool.
7. Connect to EC2 instances using Putty and generated PPK file.
8. If needed, create new conda environment. To get all required packages, Install seaborn, notebook, kmodes and scikit-learn in the new environment. This should bring in most scientific packages as a dependency.
9. Copy self-generated Jupyter notebook and data files to EC2 using SFTP client Filezilla or bitvise SFTP tool.
10. To start Jupyter Server in EC2 instance, use the command “Jupyter notebook — port port-num” where the port number could be anything you choose. In the terminal, you will see Token for connection. This token has to be used later on. Find the entry in terminal output and save it for future. Every new run generates a new token.
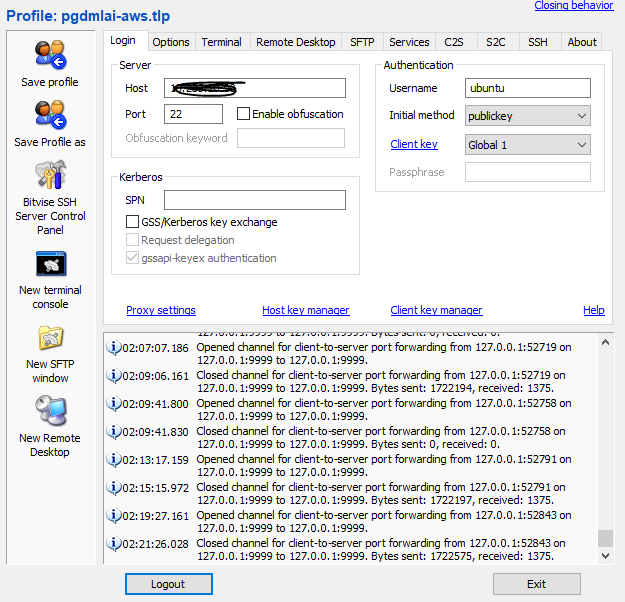
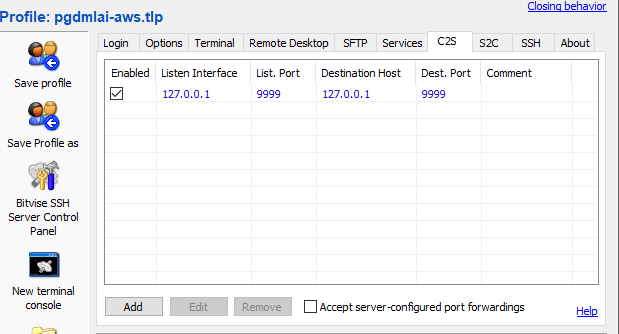
11. Use Putty or bitvise tunnelier to create SSH tunnel. For long-term and more convenient options, use bitvise tunnelier. Port mapping in bitvise tunnelier should be done as given in the screenshots towards the end.
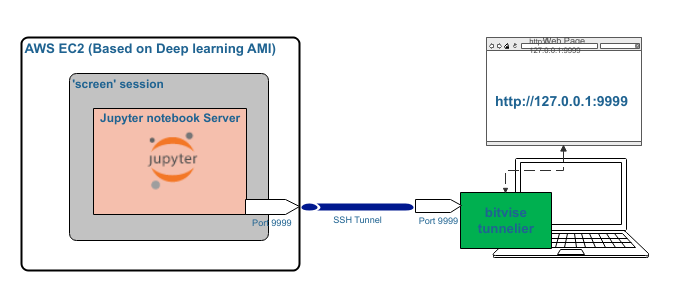
12. Jupyter notebook can now be opened in your laptop browser using http://127.0.0.1:PortNumber. You will be asked to provide token copied from terminal earlier. You can now navigate to notebook copied earlier to EC2 instance. This will feel like you are working on windows machine.
13. For persistence run, Use ‘screen’ command to run Jupyter notebook on AWS machine. This will then ensure that it is not affected by Putty or bitvise terminal closure. Every new run needs a new token. To avoid token option, create passwords.
14. Make sure to restrict AWS access your public IP. This will avoid misuse. Never share PPK or PEM file with any unknown entity.
15. Deep learning AMIs do not impose Machine configuration. These AMIs can be any configuration available. If you have a personal account, AWS may not allow you to choose more than 32 GB RAM.
More details are given by AWS and others at below links. I have also shared bitvise configuration options.
1. Running Jupyter Notebook Tutorials
2. Configure a windows putty client for AWS access
3. Test by Logging in to the Jupyter notebook server
4. Automatic SSH tunneling from Windows
5. AWS Deep Learning AMI Homepage
6. Developer Guide and Release Notes
7. Forum: AWS Deep Learning AMIs
8. Bitvise client
9. https://www.putty.org/
10. https://filezilla-project.org/
11. Use screen command in Linux
12. AWS Cost calculator
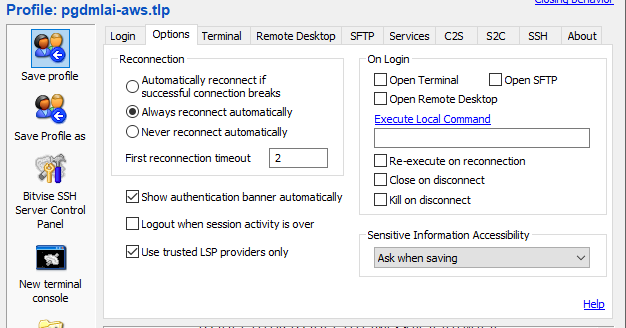
Bitvise client options