How to Delete Metadata Files (Flows, Email Alerts, etc.) from Salesforce using VS Code and Salesforce CLI
Key takeaways:
- Deleting in Setup isn’t enough – Removing metadata directly from Salesforce Setup doesn’t sync with other environments or source control.
- Use Destructive Changes for proper cleanup – The destructiveChanges.xml file ensures obsolete Flows, Email Alerts, and other components are fully deleted during deployment.
- Keep your orgs and repo aligned – Regularly clean up unused metadata to maintain consistency, performance, and DevOps best practices.
In Salesforce development, we tend to focus on creating and deploying new metadata — but often neglect deleting the obsolete ones. Deleting unused Flows, Email Alerts, or other metadata components directly from Salesforce Setup doesn’t automatically sync with your source control or other orgs (like Sandboxes or Production).
In this blog, we’ll go step-by-step on how to delete or clear metadata files (like Flows and Email Alerts) using VS Code and Salesforce CLI (sfdx or sf).
1. Objective
To ensure proper removal of unused or redundant metadata (e.g., Email Alerts, Flows) from Sandbox and Production environments, while keeping your metadata repository (Git) in sync.
2. The Problem
In many projects, developers delete Email Alerts and Flows directly in Salesforce Setup, and then remove their files from VS Code Salesforce. However, during deployment, these deletions are not reflected in the target orgs, because:
Salesforce metadata deployment only adds or updates components — it does not delete them. As a result:
- Deleted items stay in the Sandbox or Production org.
- Source control and org metadata become inconsistent.
3. The Solution: Destructive Deployment
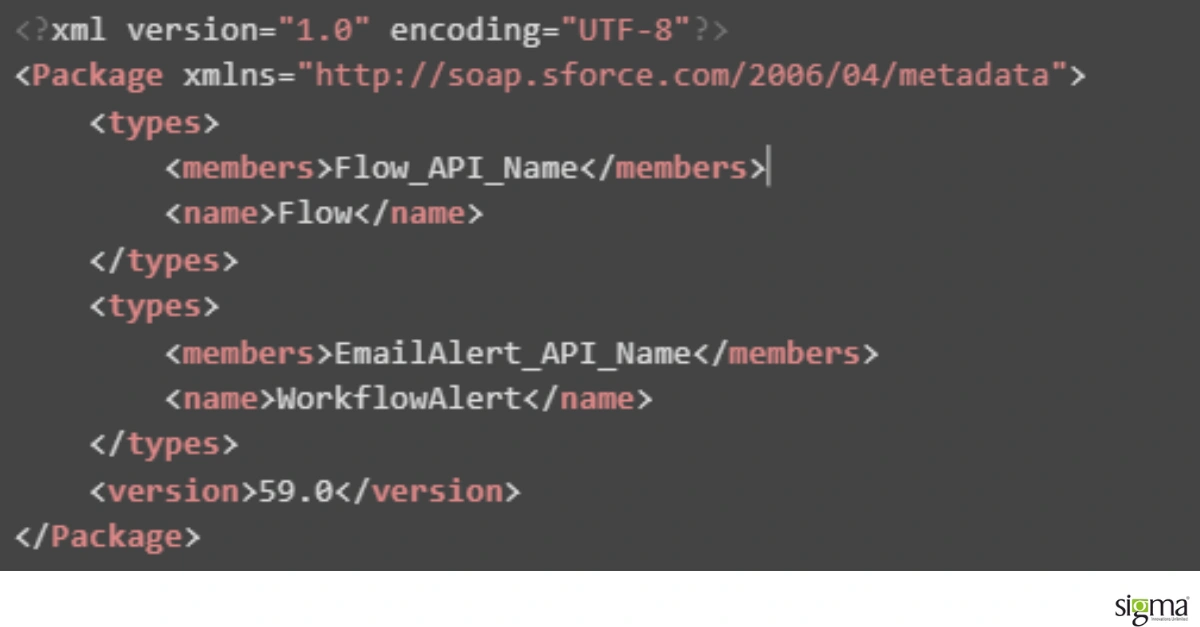
Salesforce provides a special mechanism for deleting metadata called Destructive Changes.
To delete file metadata from your orgs, you must include a file named destructiveChanges.xml in your deployment.
This tells Salesforce CLI exactly which components should be removed.
🔹 Step-by-Step Guide
Step 1: Identify Components to Delete
Find the API names of the Flows, Email Alerts, or other components you want to delete.
You can find API names:
- In Setup → Flows / Email Alerts, or
- By opening the component XML file in your VS Code project.
Step 2: 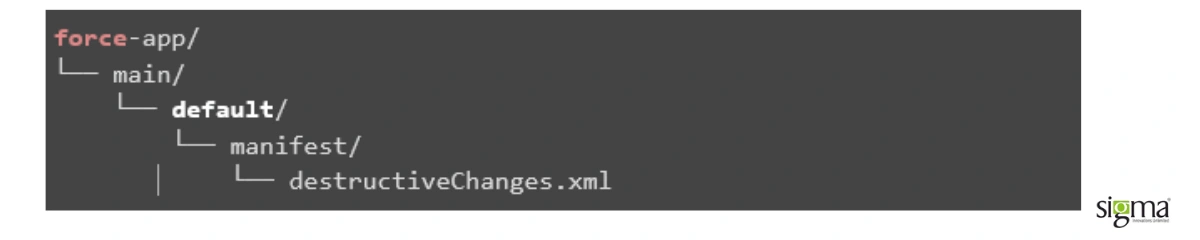
In your VS Code Salesforce project, create the following structure inside your default package (usually force-app/main/default):
Now, create two files:
🧾 destructiveChanges.xml
🧾 package.xml
 The package.xml is required even though it’s empty — Salesforce CLI expects it during deployment.
Step 3: Generate a Temporary Manifest File
Before deployment, create a temporary manifest (for context):
 This command generates a file named temp-deploy-manifest.xml in your project folder.
Step 4: Deploy Destructive Changes
Now, deploy the destructive changes using Salesforce CLI:
 Tip:
Tip:
- Replace [OrgAlias] with your org alias (like DevHub, PART_SB, or Prod).
- The –pre-destructive-changes flag ensures these deletions happen before any metadata updates.
Step 5: For Production Deployment
When deploying to Production, add the following flag to ensure all local tests are executed before deployment:
 This ensures the deployment meets Salesforce’s production validation rules.
Step 6: Verify Deletion
After successful deployment:
1. Log in to your target org (Sandbox or Production).
2. Navigate to:
- Setup → Flows
- Setup → Email Alerts
3. Verify that the listed components have been removed.
Step 7: Sync with Source Control
- Remove the deleted metadata files from your Git repository.
Commit and push the changes: Maintain a record of deleted components for auditing and traceability.
4. Benefits of Using Destructive Changes
- Ensures deleted components are actually removed from all orgs.
- ✅ Prevents orphaned metadata from remaining in Production.
- ✅ Keeps Development, Sandbox, and Production environments fully synchronized.
- ✅ Promotes cleaner, more maintainable metadata management.
5. Next Steps
- Review the list of Email Alerts and Flows to be deleted.
- Prepare a destructiveChanges.xml for the first environment (e.g., PART SB).
- Once validated, replicate the same deployment for Production.
- Maintain version control consistency by updating the repo after every cleanup.
Conclusion
Cleaning up unused metadata is an essential part of Salesforce DevOps hygiene.
By using destructiveChanges.xml and Salesforce CLI, you can safely and efficiently remove outdated components while keeping your orgs and source control fully aligned.
Ready to bring structure, automation, and consistency to your Salesforce operations?
Engage Sigma’s Salesforce Consulting Services to assess and future-proof your ecosystem.
")
 – Sigma")


