Top 8 Security Testing Tools For Web Applications

Security testing is a process to reveal flaws and vulnerabilities in an application. It is done to prevent malicious attacks from intruders and to reveal flaws in the security mechanism of web applications so that data is not accessible to unauthorized persons.
There are various kinds of security threats that the software or application is prone to and hackers are finding new methods to break into security mechanisms therefore security testing is an important part of application testing so that security threats are identified and tackled. The common security threats that testers come across while testing are:
1. SQL Injection
2. Privilege Elevation
3. URL Manipulation
4. Unauthorized data access
5. Identity spoofing
6. Denial of service
7. Cross-Site Scripting
8. Cross-Site Request Forgery
Security testing ensures that the vulnerabilities and are identified and patched. There are so many tools available to perform security testing. A few of the tools are listed below.
Below are some of the tools to do security testing:
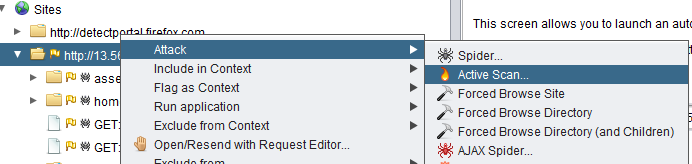
1. Owasp ZAP:
This is an open-source web application security testing tool. It’s good in penetration and functional testing. This can also be used as a scanner and can be used to intercept a proxy for manually testing a webpage.
Some of the features of Owasp ZAP are:
a. Intercepting Proxy
b. Automated Scanner
c. Passive Scanner
d. Brute Force Scanner
e. Fuzzer
f. Port Scanner
g. Spider
Features:
• It helps to Identifies the security holes present in the web application by simulating an actual attack
• Passive scanning analyzes the responses from the server to identify certain issues
• It attempts brute force access to files and directories.
• Supplying invalid/unexpected data to crash it or to produce unexpected results
• Tool is helpful to find out the open ports on the target website
How to Set Up:
This tool is relatively simple to use. The steps are described below.
Step 1: Install the OWASP ZAP application.
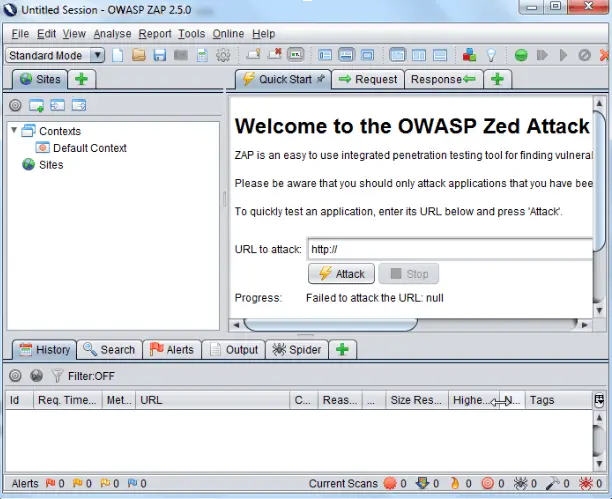
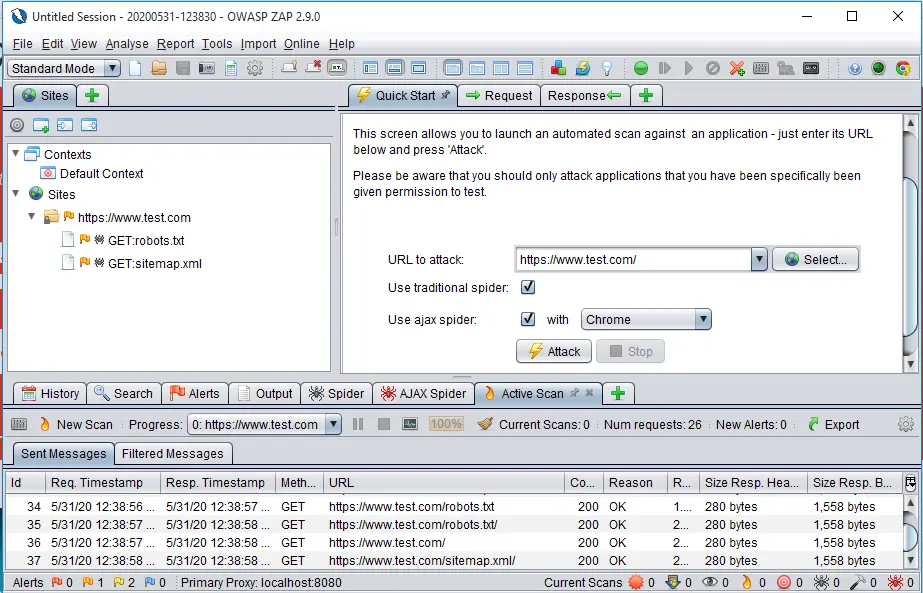
Step 2: To test using quick-start for performing the basic security test, Enter the URL in the tab and start the attack. It will automatically record all URL’s from your selected domain by crawling through your web application.
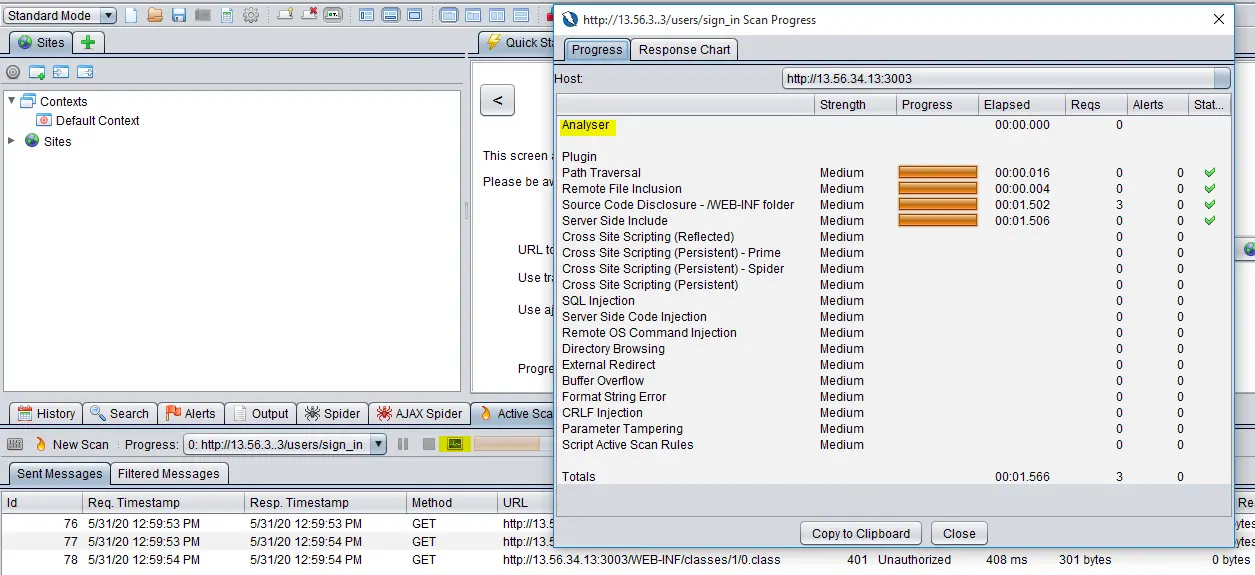
Step 3: The vulnerabilities are displayed in the alerts section and the overview can be generated by clicking in the “scan progress details button “
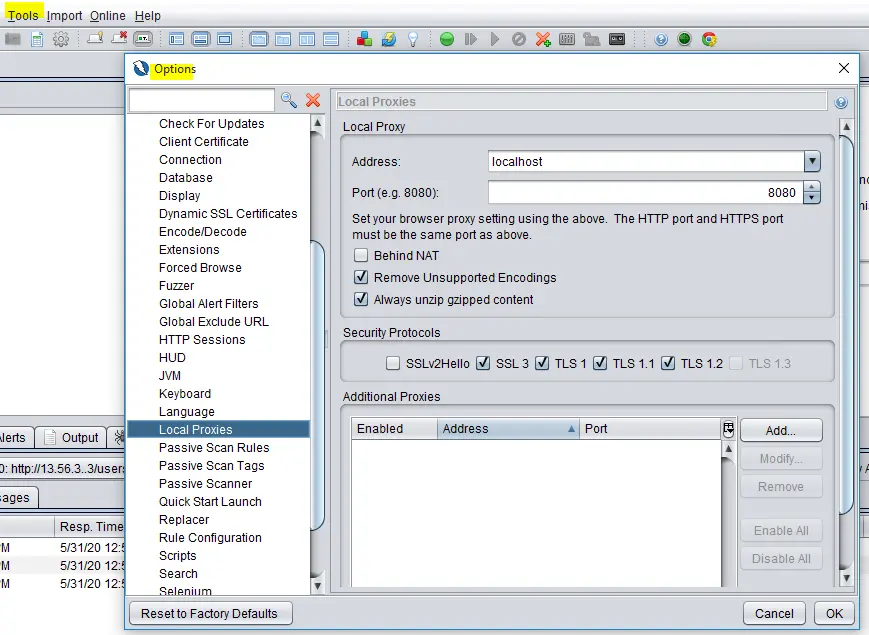
Step 4: For more thorough testing, need to configure ZAP as a proxy. This allows ZAP to record and use that traffic for a replay attack while modifying the request parameters.
Open ZAP, click on Tools > Options and click on Local Proxy. Configure the address & port on which ZAP will listen for requests. Specify the address and the port.
Change the proxy in the local browser to access the web application. Right-click > recorded site > configure ZAP to scan the found URLs
2. Magento built-in security tool & scanner:
This is a built-in tool from the Magento platform. Magento Security Scan allows you to regularly monitor each of your Magento sites for known security risks, and to receive patch updates and security notifications and receive updates about known security risks, malware, and unauthorized access. Security Scan is a free service and can be run on any version of Magento eCommerce.
• Provides the real-time security status of your store.
• Receive reports with over thirty security test results and the recommended corrective actions for each failed test.
• We can schedule a security scan to run weekly, daily or on-demand.
• Maintain security report history in your Magento account.
How to Set Up:
The Security Scan tool is available for free from the dashboard of your Magento account and the steps are described below.
Step 1: Go to the Magento home page, and sign in to your Magento account. Then, do the following:
• Choose Security Scan, in the panel on the left.
• Click Go to Security Scan.

Step 2: On the Monitored Websites page, click the +Add Site.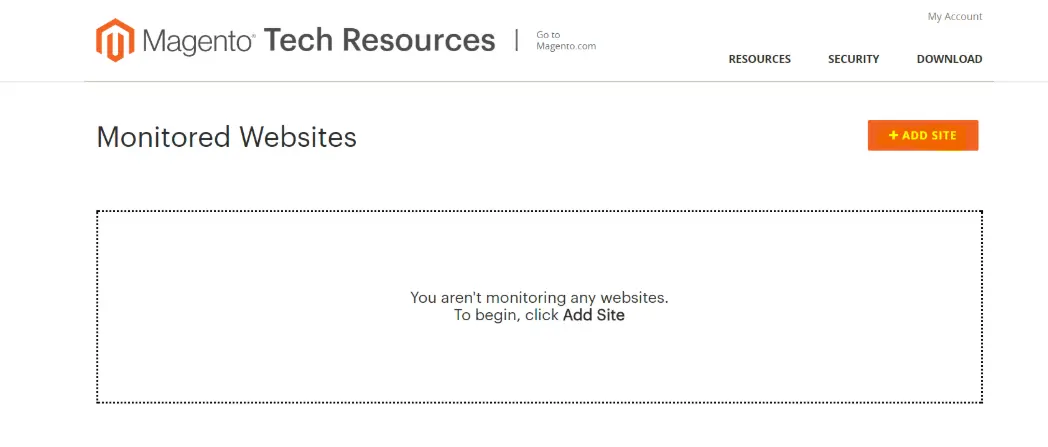
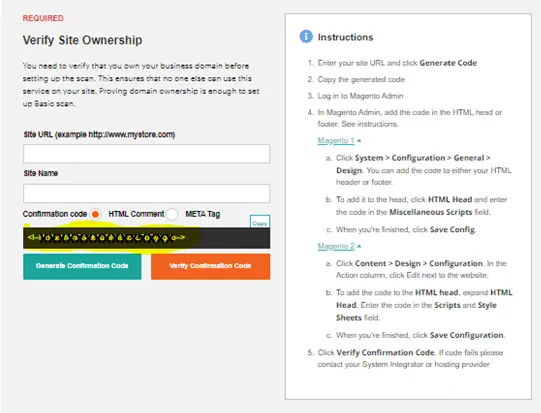
Step 3: To verify your ownership of the site domain, do the following:
• Enter the Site URL and click on Generate Confirmation Code.
• Click Copy to copy your confirmation code to the clipboard.
• Generate Confirmation Code
Step 4: Log in to the Admin of your store as a user with full Administrator privileges.
In the Admin sidebar, go to the path mentioned in the instruction for Magento1 and Magento2
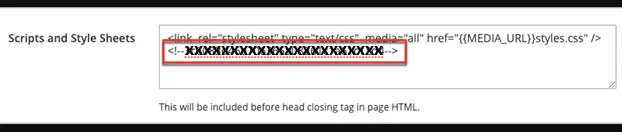
Navigate to the Scripts and Style Sheets and click in the text box at the end of any existing code and paste the confirmation code into the text box and when complete, click Save Configuration.
Step 5: Return to the Security Scan page in your Magento account. Click Verify Confirmation Code to establish ownership. When complete, click Submit.
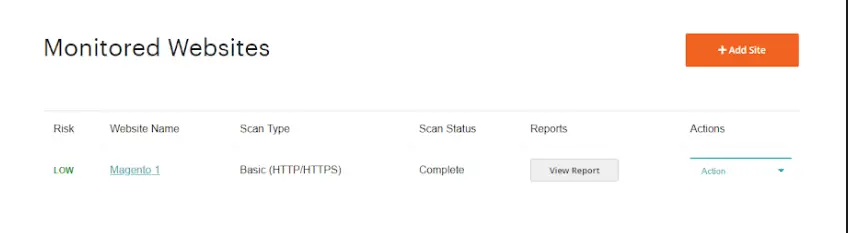
Step 6: After the ownership of the domain is verified, the site appears in the Monitored Websites list of your Magento account and we can see the result, report of the monitored site
3. Vega Security tool:
It is a free and open-source web security scanner and web security testing platform to test the security of web applications. Vega can help to find and validate vulnerabilities like:
• SQL Injection,
• Cross-Site Scripting (XSS),
• Inadvertently disclosed sensitive information
• Cross-site scripting,
• Stored cross-site scripting,
• Blind SQL injection,
• Remote file include,
• Shell injection and others.
Vega security tool runs in two modes of operation:
• As an automated scanner
• And as an intercepting proxy
Features:
• Graphical User Interface Based: Vega security tool has a well-designed graphical user-interface.
• Multi-platform: It’s written in Java and runs on Linux, OS X, and Windows.
• Extensible: Vega detection modules are written in Javascript. It’s easy to create a new attack module using the rich APU exposed by Vega.
How to Set Up:
This tool is relatively simple to use. The steps are described below.
Step 1: Click on “Start New Scan” button in the top left corner. A new pop-up would open-up like below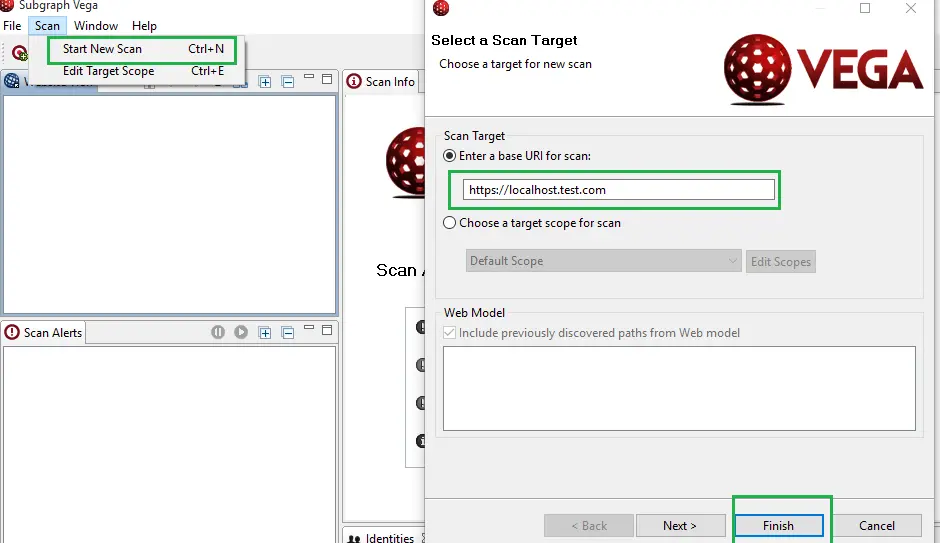
Step 2: Enter the website’s URI to scan it against vulnerabilities and loopholes. Enter all the details and hit the “Next” button, now choose the modules to run, It’s recommended to choose all the modules for better testing and once you finish it, You will the scanner in progress and once the scan is completed you would see the results.
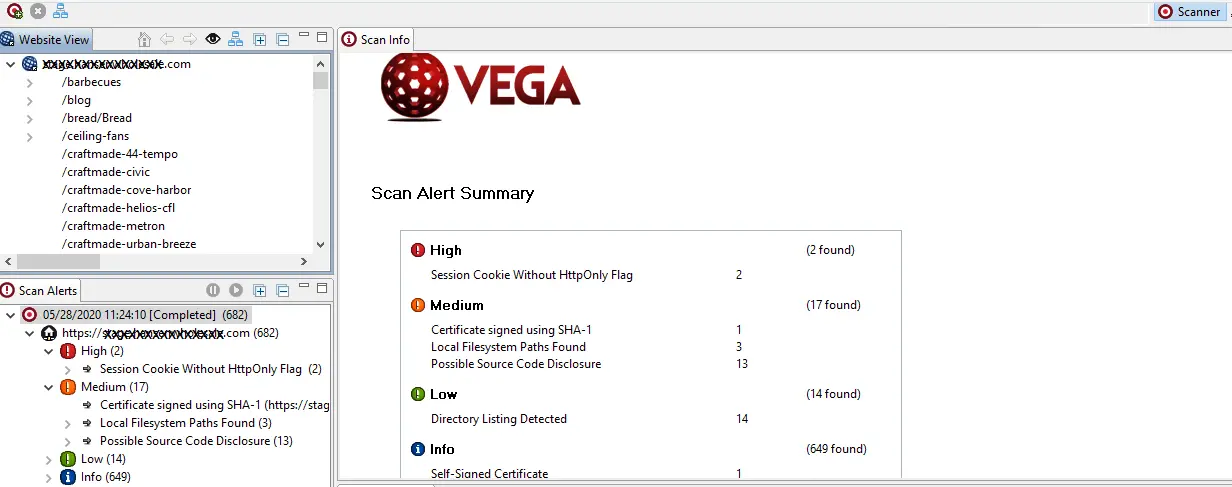
Step 3: We ran the scanner on Url provided above and the results are as follows.
Step 4: The intercepting proxy allows for a detailed analysis of browser-application interaction. When enabled, the proxy listens on the localhost as a proxy server. Requests and responses are visible to Vega when a browser uses the Vega proxy.
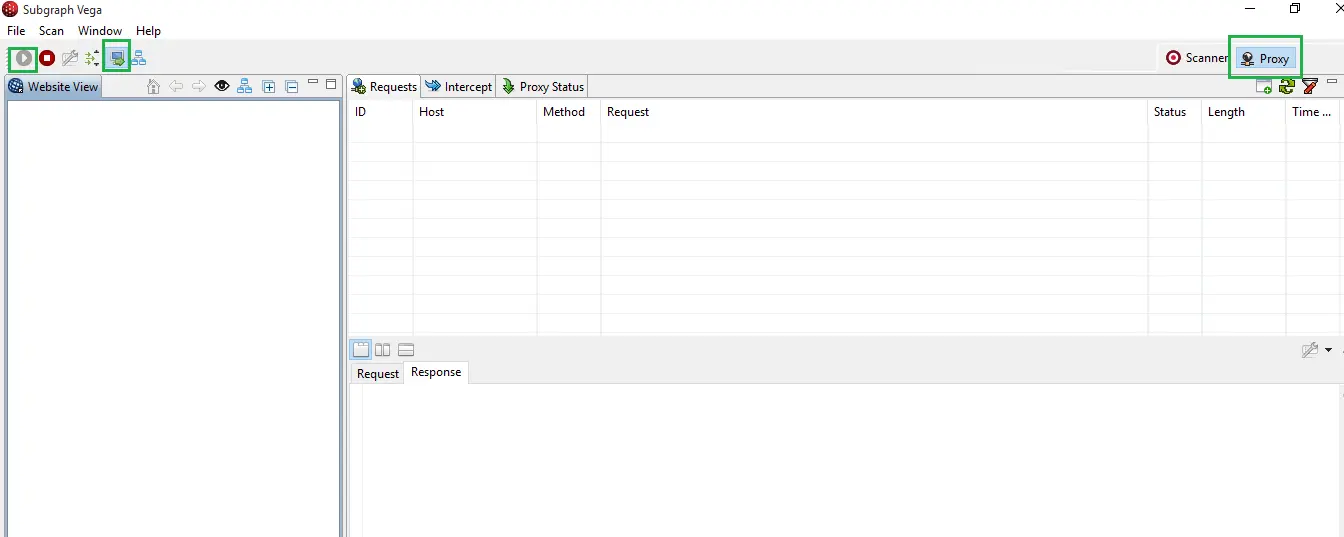
Vega can also fuzz parameters & actively test pages that match the target scope as you visit them through the proxy. Exporting the summarized execution report is not possible in Vega, Is the major problem
4. Acunetix Web Vulnerability Scanner (WVS) Security Testing Tool
Acunetix WVS is a web application security testing tool and audits a website’s security by launching a series of attacks against the site. It then provides concise reports of any vulnerability it found and will even offer suggestions on how to fix them.
Detects over 4500 web application vulnerabilities, few of them are mentioned below:
1. SQL Injection (SQLi)
2. Directory traversal
3. Cross-site Scripting (XSS)
4. Vulnerable JavaScript libraries
5. Server-side Request Forgery (SSRF)
6. Cross-site Request Forgery (CSRF)
7. Host header injection
8. WordPress vulnerabilities
Features:
• Scans for all variants of SQL Injection, XSS, and others additional vulnerabilities
• Fast and Scalable – crawls hundreds of thousands of pages without any interruptions
• Review vulnerability data with built-in vulnerability management. A wide variety of technical and complicated reports generate easily
How to Set Up:
This tool is relatively simple to use. The steps are described below.
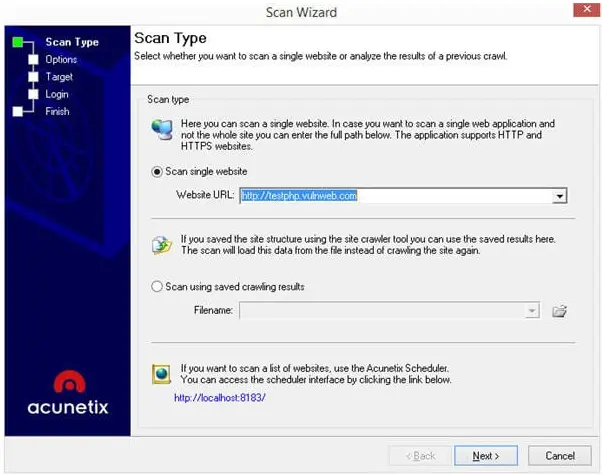
Step 1: Starting a new scan is as simple as starting the Scan Wizard by clicking the New Scan button in the main toolbar.
![]()
Step 2: We first need to tell Acunetix Web Vulnerability Scanner what site we’d like to scan.
Next, select a Scanning Profile. This feature allows to customize what tests we want. We can choose from the several built-in Scanning Profiles, or you can create custom Scanning Profiles that suit specific requirements.
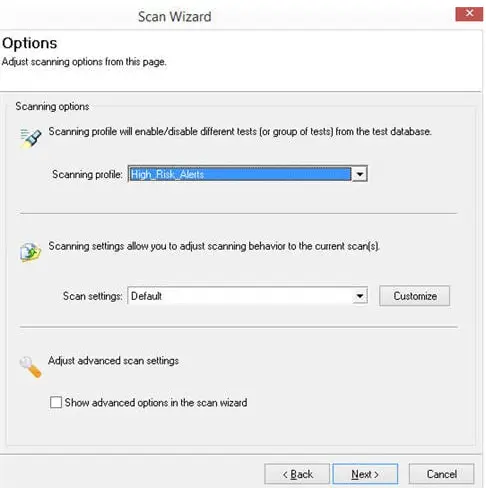
For HTTP proxy, configure that from here by clicking the Customize button next to the Scan Settings list box.

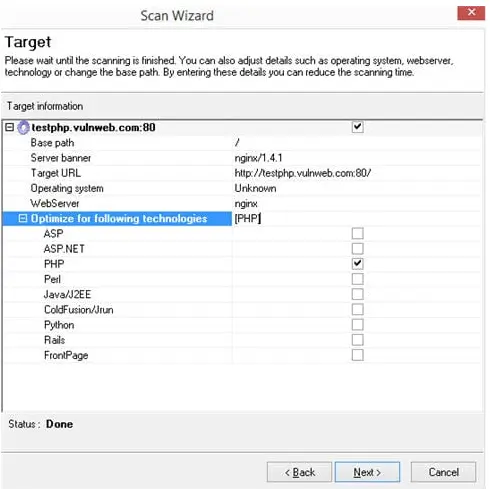
Step 3: On click of next from the scan option, we can do Scan Optimization, We can optimize the scan for a specific technology. Acunetix WVS will try to find the web application in order to detect the technologies it is using to reduce the scan time.
Step 4: On click of next will take to the Login option, If the site has a login page, we need to create a Login sequence to instruct the scanner on how to log into the application.
We can either use the scanner login or else we can create a Login Sequence manually
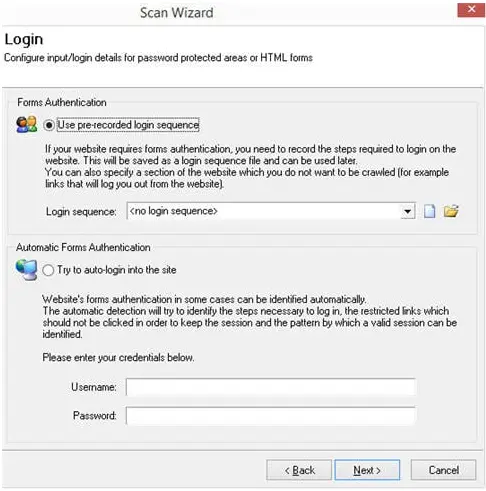
Scanner makes creating a Login Sequence easy, simply go through your normal login process of signing into an account and the actions are being recorded. The scanner will replay the actions to login during the scan.

If we click Next we have the option of selecting the links we want the scanner to click on while logged in.
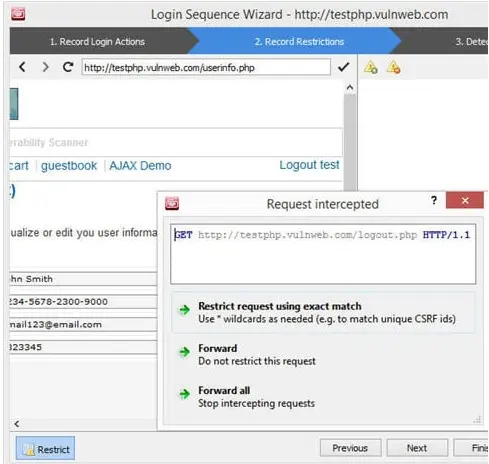
We can restrict links and on click Next. The scanner needs to understand when it is logged in and when it is logged out. The Login Sequence Recorder needs Session Pattern.
Clicking Finish will ask to save the Login Sequence. We can use this at any time later you want to scan the same site.
Step 5: After the crawl and scan are complete, tool will list the vulnerabilities that it detected on the test site.
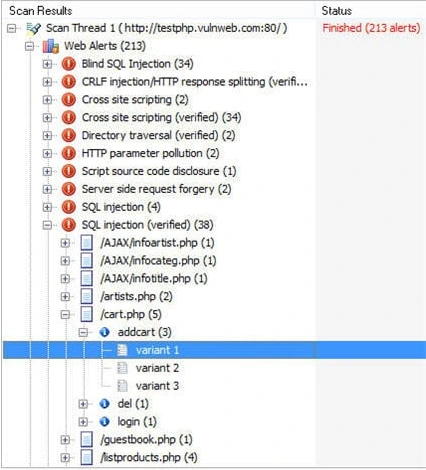
On click of the variant of vulnerability explains the vulnerability in detail.

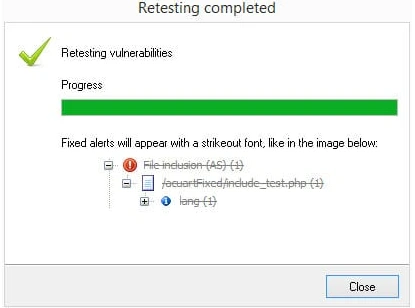
Step 6: We can re-run tests after the Vulnerability Fix
Re-running the scan from the start is one way of checking if the fix for a vulnerability detected is successful.
Acunetix WVS supports the Retest feature. Right-click an alert need to retest and select Retest alert(s). The tests that detected that vulnerability will be re-run and the result will be shown. If the vulnerability is resolved, the tool will mark it in a gray strike through font.
Step 7: You can generate reports by clicking the Reporter button in the main toolbar.
![]()
When the Acunetix Web Vulnerability Scanner Reporter loads, we can select any of the report types from the list.
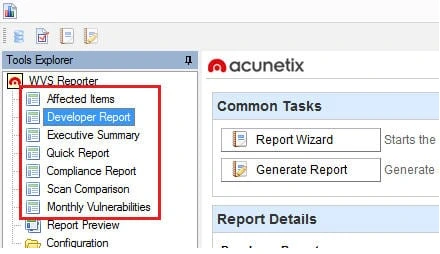
The most detailed report is the Developer Report. This report is also highly configurable, allowing the user to include all the necessary information in the report.
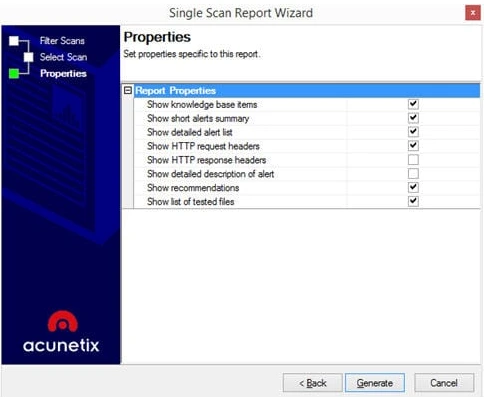
Clicking Generate will produce a report.
5. Burp Suite:
It’s an integrated platform for performing security testing of web applications. Its various tools work together to, support the entire testing process from initial mapping and analysis of an application’s attack surface, through to finding and exploiting security vulnerabilities.
The tester can make the internet browser traffic route through the Burp Suite so that it acts as a man in the middle by capturing and analyzing each request from the web application so that it can be analyzed. Burp Suite offers various tools like:
1. Spider
2. Proxy
3. Intruder
4. Repeater
5. Sequencer
6. Decoder
7. Extender
8. Scanner
Features :
• Burp Suite keeps track of all HTTP requests, responses and displays all data using the target site map functionality.
• Automatically crawl web applications & retrieve visible & hidden resources
• A Repeater tool – For manipulating & resending individual requests
• Supports the automatic scan with Burp Scanner
• An Intruder tool – For performing customized attacks to find & exploit unusual vulnerabilities.
How to Set Up:
Initial setup of software installation and proxy setup for browser needs to be done to use Burp Suite.
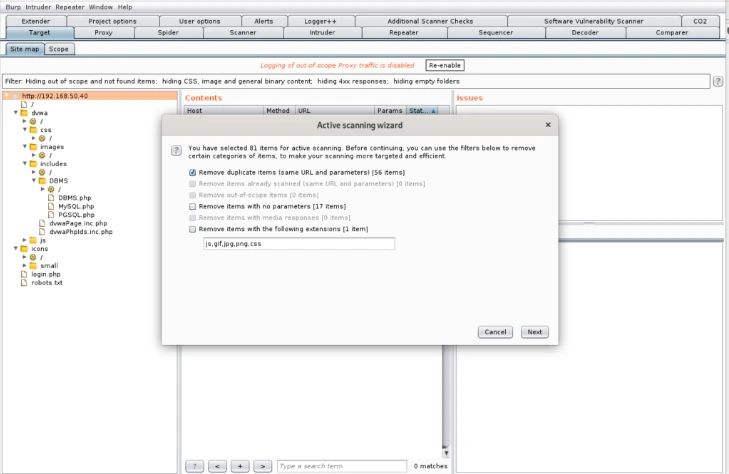
To start testing the web application it must be added to the target scope Under > Target > Scope
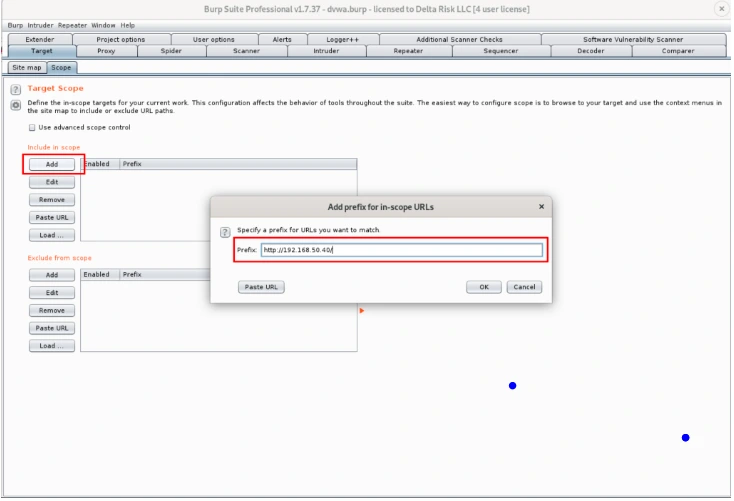
Select stop sending out of scope requests if needed.
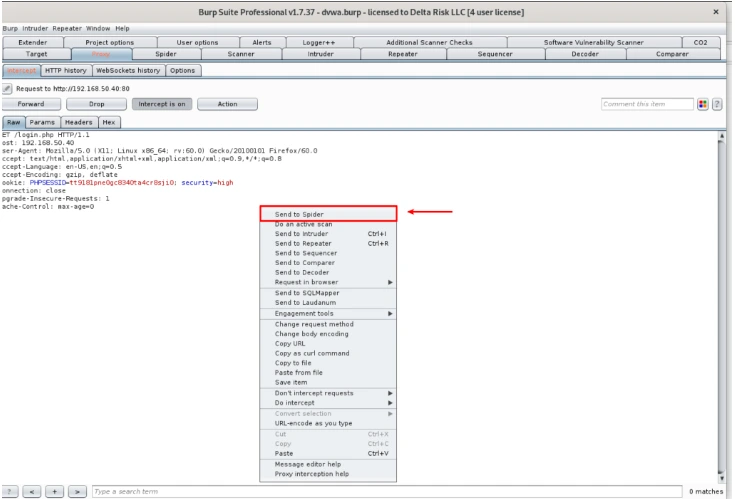
Disable Logging of Out-of-Scope Items by navigating to the Proxy -> Intercept tab, and ensure that “Intercept” is on.

Turning on the “intercept” switch will allow Burp to capture and hold the next web request that is performed through the Browser

Once the request is successfully done, we can execute multiple different actions. With the application already set in our target scope, we will right-click in the “Intercept” screen, and we will send to Spider.
After sending the request to the “Spider” we can see that the site map of the Web Application
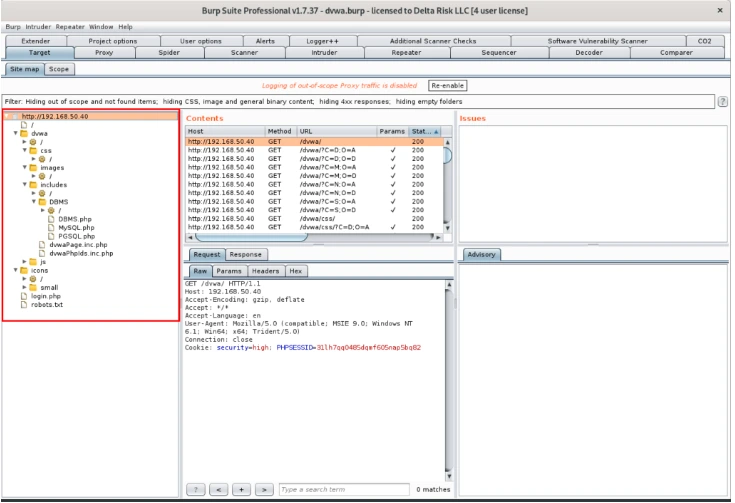
We can manually browse the identified pages, and functions detected during the spidering process. Browsing the pages will show us the requests and responses sent through Burp.
We are going to actively scan the sitemap Burp identified. This will use the excellent Burp scanning engine. For this, right-click the root of the sitemap, and select “Actively scan this host.”

After executing the scans, we can see the progress and current results.
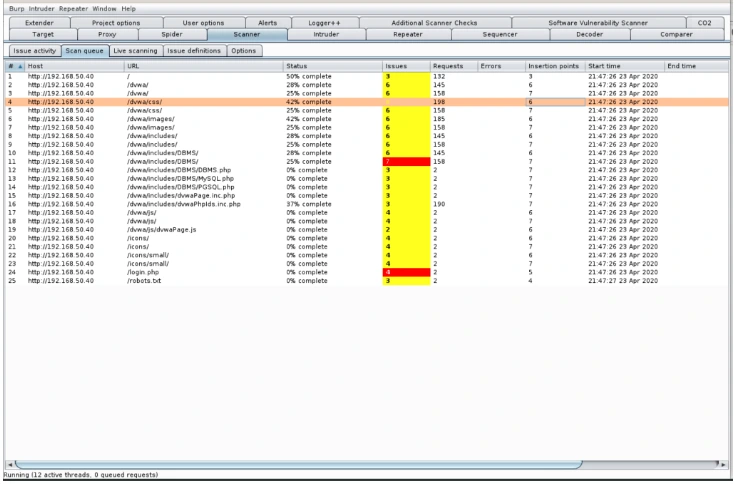
The “Scan Queue” breaks into the URL, Host, Status, Issues, and timestamp of the scanned items.
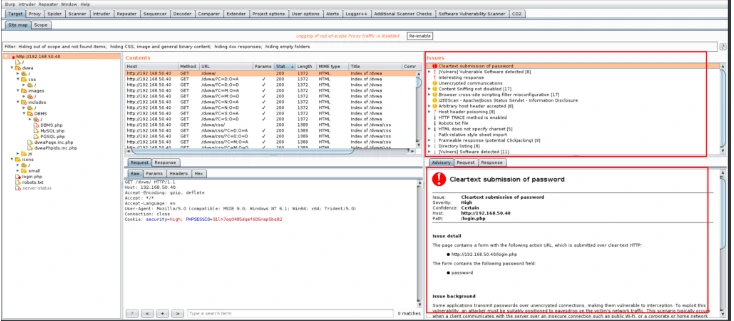
The results of the scans running can be seen by clicking on the root of the URL in the sitemap. In the “Issues” and “Advisory” windows. We can browse through the detected vulnerabilities, information on the background of the issue, and see the requests and responses transmitted. The issues are categorized by severity, which can be viewed by the color next to the issues.
Burp can often generate many false positives during the scanning, Manual validation of critical findings is necessary.
Conclusion:
Burpsuite is a comprehensive and excellent security testing tool. It works on by web application scanning, intercepting proxy, crawling content and functionality, etc. The advantage of using Burpsuite is that we can use this on Windows, Linux and Mac OS X environment. The most valuable features are Burp Intruder, Burp Scanner, etc… and provides the application security. It also has a reasonable price.
Vega provides a plus to its competitors with its open-source and performance ratio. The advantage of using Vega is that you can use this on Windows, Linux and Mac OS X environment. It is considered as a very good alternative for individual use in systems of lower severity and will help us to detect the vulnerabilities. And also, the modules can be arranged or rewritten and provides a great advantage to users.
